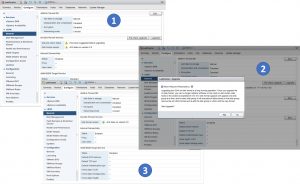
Some time ago I decided to upgrade my home lab environment running vSphere (from 6.0 U3 to 6.5 U1) and vSAN (from 6.2 to 6.6.1).
I started with upgrading the vCenter appliance which is quite a smooth upgrade process. The only problem I had is that initially the upgrade wizard did not give me a choice to select “Tiny” as the size for the new appliance. This appeared to be an issue with the disk usage of the existing appliance. After deleting a bunch of old log files and dump files from the old vCenter appliance I retried the upgrade wizard and this time the “Tiny” option was available – which is a better fit for my “tiny” lab 🙂 – and the upgrade process went just fine.
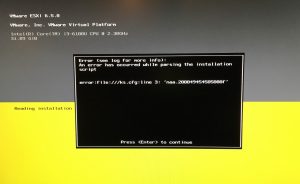
Next up was the ESXi upgrade (I have three hosts). First try was doing an in-place upgrade using Update Manager. However with the first host I tried I received an error :
Researching this issue quickly on the internet gave me the impression this was an issue caused by booting the host from USB. Since I also wasn’t sure the use of a USB Ethernet adapter and non-standard driver might be a problem doing a regular upgrade I decided to create new USB thumb drives with ESXi version 6.5 U1 and do a fresh install for each of the ESXi hosts. This means for each of the hosts :
- Remove the old 6.0 U3 host from the cluster (and the vDS … and vCenter)
- Do a fresh install of ESXi 6.5 U1 on the host
- Add the new host to the vCenter 6.5 U1 environment
- Add the new host to the vDS
- Configure the new host for iSCSI/NFS, etc.
- Add the new host back to the vSAN cluster
With step 1. when having the old host enter maintenance mode I chose “Ensure Accessibility” because I only have 3 hosts. I figured that leaving the vSAN controlled disks intact would allow the host to re-join the vSAN cluster after being upgraded to ESXi 6.5 U1 without having to re-create the disk groups and only having to resync the out-of-date objects.
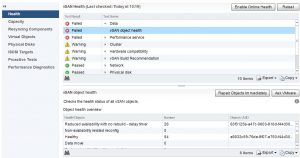
This process seemed to work just fine and I was able to do a fresh install of all the ESXi hosts and leave the existing vSAN datastore intact. However for some reason after upgrading all hosts and before upgrading vSAN from disk format v3 to v5 I noticed several objects were unhealthy showing a status of “Reduced availability with no rebuild – delay timer”. Normally this shows up when objects are temporarily unavailable (most notably when a host is in maintenance mode) and after the “ClomRepairDelay” timer expires vSAN will create new components and make the objects compliant again. This time however this didn’t happen and also pressing the button “Repair Objects Immediately” did not change anything.
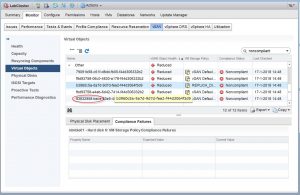
So I had to further troubleshoot the non-compliant objects. I found that several objects that had an issue were not visible in the WebClient as belonging to a specific VM, but were showing up in the category “Other” :
To find out what these objects were all about I first used the Ruby vSphere Console (RVC) and checked out the object starting with 83832958-bece- (highlighted in the screenshot above) using the command “vsan.object_info” :
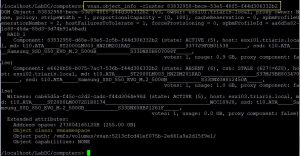
The output of the command did show that the object class was “vmnamespace”, but did not really show what VM it referred to. So I used the next tool in the vSAN troubleshooting toolkit which was the “objtool getAttr” command. This can be found on the ESXi host in the directory /usr/lib/vmware/osfs/bin. The output of this command showed that the object belonged to a VM named “Client”. However this VM had been moved to an NFS datastore before the upgrade so apparently this was an object that was not properly cleaned up after the Storage vMotion.
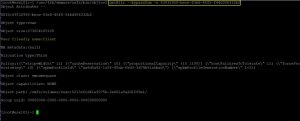
Cleaning up the object can be done with the “objtool delete” command.
After this object I looked at another one and this time it showed an object class of “vdisk” and an object path ending on “W81x64Template.vmdk”. This was a virtual disk of an existing virtual machine template. So I decided to convert this template into a VM and this time when I checked the “Virtual Objects” pane in the WebClient it no longer was in the category “Other”, but the actual VM showed up …. however still being Noncompliant.
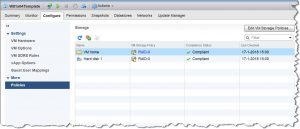
To solve this problem I decided to create a new VM Storage Policy called “RAID-0” with a “Primary Failures To Tolerate” (PFTT) of zero and apply this policy to the actual VM.
This worked like a charm and made the VM compliant again … however without protection at this point. So after this I changed the policy back to the default vSAN policy (which includes PFTT=1) and my VM was again protected and this time the objects were healthy.
I used the same procedure for other non-compliant objects to make sure all objects were healthy before doing the actual disk format upgrade. The only additional problem I encountered during this process was when I got an error message after applying the RAID-0 policy to a Horizon Instant Clone Replica saying : “the method is disabled by ‘horizon.daas’. “. That was actually no real surprise but I didn’t think of it before trying to apply the storage profile … an instant clone replica is one of the special Horizon objects that are protected within vCenter. In order to apply the RAID-0 policy to this specific VM I first had to unprotect the instant clone replica. This can be done from the Horizon Connection server console using the “icunprotect” command.
Finally I was ready to go to the final step which was upgrading the vSAN cluster disk format. This process went without any issues and my planned upgrade was finished !

